Compare & Choose
Car Polisher Guide: DIY Machine Polishing vs Pro Correction
Key Takeaways
- A dual action (DA) car polisher is the safest pick for beginners because its wobbling pad spreads heat.
- Rotary polishers cut faster, but they heat paint quickly and can leave hazy trails called holograms.
- Every machine polish removes a thin layer of clear coat, and that layer never grows back.
- DIY polishing suits light swirls on one panel, while dark paint, whole-car correction and ceramic prep are pro jobs.
- Golden Bay Detailing does mobile paint correction in San Francisco, the Peninsula and Marin, with 1-stage correction from $399.
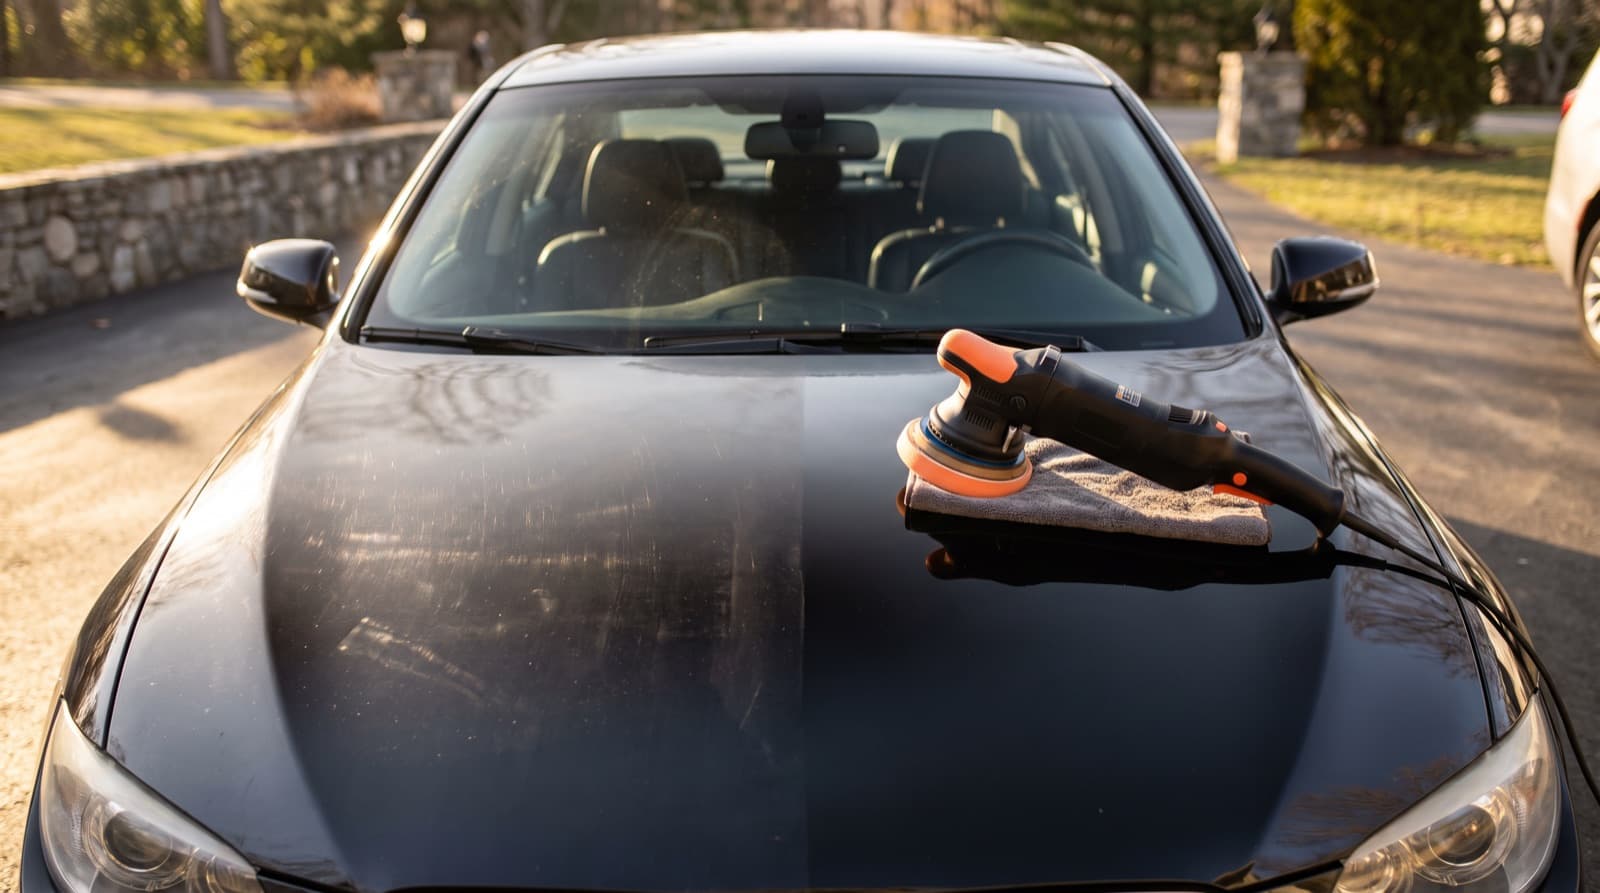
A dual action car polisher is safe enough for a careful beginner to fix light swirls. Dark paint, a whole car, or prep before ceramic coating is a job for a pro. The tool is not the hard part. Knowing how much paint you can safely remove is.
A DIY kit makes sense for light swirls on one panel. For a one-time, whole-car job, a pro 1-stage correction from $399 can cost less than a kit plus one mistake.
Tool reviews tell you what a machine can do. We also cover how to use one safely, and what it can't fix.
What does a car polisher actually do?
A car polisher spins a pad loaded with a liquid abrasive. That liquid holds tiny grit. The grit shaves the clear coat, the clear top layer of paint that makes it shine.
Swirls and light scratches are tiny valleys in that clear layer. Polishing lowers the surface around them until they vanish. So car polishing means removing a little paint to make the rest look perfect.
You will also hear this tool called a buffer, polishing buffer, auto buffer polisher or car buffing machine.
What is the best car polisher for beginners: DA, forced rotation or rotary?
A beginner should use a dual action (DA) polisher. It is much less likely to burn paint than a rotary, though thin edges can still burn. The three types differ in how the pad moves, which sets how fast they cut and how hot they run.
- Dual action (DA) polisher: the pad spins and also wobbles in a random, off-center circle. The wobble spreads heat. This is the best car polisher for beginners.
- Forced rotation DA: gears keep the pad turning, even when you press. It cuts faster than a free DA but runs hotter. It suits someone with some practice.
- Rotary polisher: the pad spins on one fixed point, like a drill. It cuts and heats the fastest. In new hands it can leave holograms (hazy, rainbow-like trails in the sun) or burn an edge.
Pro tip: Shopping for a dual action car polisher? Check the throw, which is how far the pad wobbles off center. A short throw handles curves and tight spots. A long throw covers flat panels faster but is harder to control on curves.
Which pad and polish should you use with a DA polisher?
Start with the gentlest pair: a soft pad and a fine polish. Step up one rung only if swirls remain on your test spot. Each rung removes more clear coat.
Compound has more grit than polish. It cuts deeper marks but often leaves haze, so a polish step follows it. Our car buffing guide covers where glaze and wax fit in.
Use a 5 to 6 inch pad on big panels. A 3 inch pad on a small backing plate (the disc it sticks to) reaches pillars and mirrors. Own several pads, and swap to a fresh one when a pad clogs or gets hot.
- Rung 1: soft finishing pad with fine polish. It cuts the least and leaves the most gloss.
- Rung 2: medium polishing pad with polish, for light swirls.
- Rung 3: firm cutting pad with polish, for a bit more cut.
- Rung 4: firm cutting pad with compound. It cuts the most, so follow it with rung 1 or 2 to clear the haze.
Pro tip: Prime a new pad before the first pass. Spread a thin film of polish across its face with a clean finger. A dry pad skips and cuts unevenly.
How do you polish a car with a DA polisher, step by step?
Plan a full day for your first car. Work in shade on a cool, dry panel. Prep matters more than the machine.
- Wear eye protection. Keep the cord over your shoulder so it can't slap the paint. On damp days, plug into a GFCI outlet (the kind with a reset button).
- Wash and dry the car well, so the pad can't drag grit around.
- Clay the paint with plenty of clay lube spray. A clay bar is a soft clay that pulls stuck grit off paint.
- Tape off rubber seals, rough plastic trim and badges. Stay an inch away from thin edges and sharp body lines, where clear coat burns first.
- Pick a test spot about two feet square on a flat panel. Use a soft pad, fine polish and three or four pea-size drops.
- Set the pad flat on the paint before you turn it on. Turn it off before you lift it, so polish doesn't fling everywhere.
- Spread the polish on low speed, then work it at medium-high. A DA does little cutting at medium speed.
- Move about an inch per second. Make four to six overlapping passes, side to side and then up and down, with light, even pressure.
- Wipe it off and spray panel wipe (a mild spray that strips polish oils). Check under a bright light, and step up a rung only if swirls remain.
- Brush the pad clean after each section, or it clogs and runs hot.
- Finish with wax, sealant or a coating, since polishing strips off old protection. Your polisher can spread it, with a soft pad on low speed.
Pro tip: If the pad turns the color of your car, you likely have single-stage paint (no clear coat on top). It is common on older cars. Go extra gently, since you are cutting the color itself.
What can go wrong when you polish your own car?
The big risks are burn-through, holograms, heat, stained trim and hidden repaints. Slow, careful work avoids most of them.
The worst risk is one you can't see. Factory clear coat is thinner than a sheet of paper, and it never grows back. Every polish uses up a little of it. That is why pros measure paint before they cut.
- Burn-through: the pad cuts past the clear coat into the color below. Polish can't fix it. The panel needs paint.
- Holograms: hazy trails, mostly from a rotary. A pad that is too harsh on a DA leaves a dull haze instead.
- Too much heat: staying in one spot too long can soften paint and warp nearby plastic.
- Stained trim: dried compound leaves white marks on rough plastic.
- Hidden repaints: a body shop panel may be thinner or softer than the rest. You can't tell by looking.
What can't a car polisher fix?
A car polisher only fixes damage that sits inside the clear coat. Anything deeper needs a different fix.
- Scratches that catch your fingernail: they often cut through the clear coat. Polish can soften the edges, but deep ones need touch-up paint or a body shop.
- Rock chips: the paint is gone, not just scuffed. They need touch-up paint.
- Peeling or flaking clear coat: polishing lifts more of it. The panel needs a repaint.
- Dents and dings: the metal is bent. They need dent repair, not polish.
- Deep etching from bird droppings or water spots: light marks may polish out. Deep ones can sink too far into the clear coat to remove safely.
Is a car polisher cheaper than pro paint correction?
It can be, if you own the tools and have the skill. For a first-timer, the math is closer than it looks.
Price out a machine, pads for each rung, compound, polish, towels, tape and a good light. Add a weekend of learning. One burned edge means a body shop visit, which can cost more than the whole kit.
For a one-time fix on one car, that total can come close to a 1-stage correction. If you will polish several cars over the years, the kit pays off.
At Golden Bay, 1-stage correction starts at $399, 2-stage at $799 and multi-stage at $1,199. Here is how we would decide.
| Your situation | Best choice | Why |
|---|---|---|
| Light swirls on one panel of an older daily driver | DIY | A good first project with a DA polisher and low risk |
| Light swirls on a whole light-colored car | DIY or pro | Doable with patience; a pro gets an even finish faster |
| Black or other dark paint | Pro | Every bit of haze and every hologram shows |
| Soft paint that marks easily | Pro | It hazes fast and needs the right pad and polish pair |
| Whole car before a sale or lease return | Pro | Even results on every panel, with no learning curve |
| Prep before ceramic coating | Pro | A coating locks in whatever is under it |
| A scratch that catches your fingernail | Pro look first | It is likely too deep for polish alone |
| Peeling or flaking clear coat | Do not polish | Polish can't fix failing clear coat; it needs paint work |
Why is DIY polishing harder in the Bay Area?
Bay Area life adds a few hurdles that tool reviews never mention.
- Street parking: often no outlet and no shade. A cordless polisher helps, but a whole car drains batteries fast.
- Apartment garages: dim light hides swirls, and some buildings limit car work.
- Fog and dew: a damp panel makes polish smear. Wait until the paint is fully dry.
- Salt air and beach sand: grit from Ocean Beach clings to paint. Wash and clay first, or the pad grinds it in.
- Sunny afternoons: inland Marin and Peninsula panels get hot and dry polish too fast.
- Water spots: the fog-wet, sun-dry cycle leaves spots. Light ones may polish out. Deep ones can etch the clear coat, and they show most on black cars.
Pro tip: No shade or outlet? We bring our own water and power. Our technicians can polish in your garage or at a legal street spot.
When should you call a pro for paint correction?
Call a pro when a mistake would cost more than the job.
Our technicians measure paint thickness and test a small spot first. Then they pick the gentlest pad and polish that works.
Planning a coating? Our ceramic coating starts at $799, and that price includes a 1-step paint correction.
We come to you across San Francisco, the Peninsula and Marin. For paint correction, we also reach Palo Alto and parts of the East Bay.
- Your car is black or another dark color.
- You want the whole car corrected, not just one panel.
- The car has repainted panels, thin paint or failing clear coat.
- You already tried polishing and now see haze or holograms.
Frequently Asked Questions
Can you use a drill as a car polisher?
It is not a good idea. A drill spins like a rotary, with no wobble to spread heat. Its speed is also hard to control, so it can haze or burn paint fast.
Should you buy a corded or cordless car polisher?
A corded polisher gives steady power for a whole car. A cordless one works where there is no outlet, but batteries run down on big jobs. If you go cordless, plan on a spare battery.
Is a car polisher the same as a buffer?
Mostly, yes. Buffer, polishing buffer and car polisher usually mean the same tool. Cheap round waxers with a cloth bonnet only spread wax and can't remove swirls.
Does Golden Bay Detailing do paint correction at my home?
Yes. Our technicians come to your home, office or garage in San Francisco, the Peninsula and Marin. A 1-stage correction starts at $399, and you can request a free quote online or call (415) 483-5686.
Keep reading from Golden Bay
Skip the learning curve on your paint
Get a free paint correction quote. Our technicians come to your home, office or garage with their own water and power.